Sunday 29 May 2011

Banana Maple Porridge with Roasted Rhubarb

I love breakfast in winter. I love hot breakfasts be they sweet or savoury. In the summer time it is usually too hot to indulge in a lovely hot breakfast. I particularly love porridge. In winter I have a bowl almost every day. It is a wonderful way to start the day. Last year I found a recipe that used different types of rolled grains to make porridge. Since then I have been doing the same. At present I have rolled oats, rolled barley and rolled rye. I mix then in a ratio of 2:1:1. The barley and rye certainly add something to porridge, especially the rye. It seems to be a tougher grain. It can require a bit of extra cooking. Although I prefer not to cook any longer and have some lovely chewy bits in my porridge.

I normally love my porridge served with chopped banana, sprinkled with cinnamon and drizzled with maple syrup. Another favourite is to throw in a handful of sultanas while cooking and serve with honey and a grating of nutmeg or sprinkle of ground cardamom. Bill's recipe had the banana and maple cooked in with the oats and, to be honest, it wasn't really for me. The banana flavour was a bit overwhelming and seemed to lose the maple flavour. I did like the results from soaking the oats for 10 minutes before cooking, it seemed creamier, but I will stick with adding the banana and maple syrup after cooking. Bill served his with Buttered Apple. While it looked really good but I had some rhubarb in the fridge that needed using so I chopped it up sprinkled with caster sugar and baked in the oven for 15 minutes, until tender, and served some of that with my porridge. 

Banana Maple Porridge 

Ingredients: 
  • 1 c. rolled oats
  • 1 1/2 c. boiling water
  • 1 c. milk 
  • pinch of salt
  • 1 tbsp brown sugar
  • 2 tbsp maple syrup 
  • 1 banana, finely slice
Method: 
  • Combine oats and water in a pan and let soak 10 minutes. 
  • Add the rest of the ingredients and then bring to a boil then reduce heat to simmer and let cook 10 minutes. 
  • Let stand 2-3 minutes before serving with roasted rhubarb. 

Friday 27 May 2011

Tomato Pesto & Feta Swirl Bread

A few weeks ago I had the urge to bake something breadish. I was initially going to make some plain rolls and then thought that I could spice it up a bit by making some filled scrolls instead. I was thinking in terms of cinnamon scrolls. At the time there had been a spate of cinnamon swirl loaves on foodgawker and tastespotting. So instead of individual scrolls I thought I might make a whole loaf. However, I didn't really want something sweet, I was more interested in making something savoury. Going to the fridge I found half a jar of tomato pesto and half a block of feta cheese. They seemed like a perfect fit, although I think next time perhaps some parmesan as well. 

Late in 2009 I came across the perfect bread roll/dough recipe over at Phemomenon's blog and since then it has been my go to recipe for rolls and scrolls. It is such and easy recipe, although I have tweaked it a bit over the many times that I have used it. So when I decided to make this loaf I saw no reason not to use that same recipe and it certainly did not disappoint. I was rewarded with a fantastic loaf of bread that rose and browned beautifully. The tomato pesto flavour really worked well  and the little bits of feta were perfect throughout. I will definitely be using this recipe again and again and again. 

Perfect Bread Dough

Ingredients:
  • 1 c warm water
  • 1/2 c warm milk 
  • 3 tsp instant yeast
  • 1 tbsp sugar
  • 2 tablespoons olive oil
  • 1 teaspoon sea salt
  • 3 1/2 c plain flour, lightly spooned into measuring cup, then leveled off
  • 1/2 c extra flour if required
Method: 
  • Combine water, milk, yeast and sugar in KitchenAid bowl and stand until frothy. This should take 5 - 10 minutes. 
  • Add oil, salt, and 2 cups of the flour  and, using the paddle attachment, beat on a low speed to combine. 
  • Add in a further 1 cup of flour and continue beating until incorporated. 
  • Change to dough attachment and add remaining 1/2 c flour (adding some or all of the extra 1/2 c if the dough is too sticky). Continue to mix the dough until it pulls away from the sides of the bowl. 
  • Increase speed slightly, I don't go over 3 on mine for doughs, and let knead for 10 minutes. 
  • Remove the dough from the bowl, oil it with some olive oil and return the dough to the bowl turning it to coat in the oil. Cover and let rise until doubled in size, approximately 20 minutes.
  • Turn the dough out onto a lightly floured surface. Press dough out into a rectangle the same width as the pan you plan to bake it in.
  • Spread with tomato pesto (however much you like) making sure to leave a border around the edge and top with crumbled feta cheese. 
  • Carefully roll the dough up and place into your bread tin with the seam at the bottom of the pan. Cover with a clean tea towel and leave in a warm place to rise for approximately 20 minutes. 
  • In the meantime pre-heat oven to 200C. 
  • Brush the top of the loaf with either melted butter, milk or beaten egg (I forgot to do this) and bake in the oven for approximately 30 minutes or until golden. You may need to turn the pan halfway through baking to get an even colour. 
This was lovely served warm or cold and even toasted up really well under the grill. 


Wednesday 25 May 2011

Red Quinoa, Turtle Bean & Carrot Taco Bowl

On my recent holidays I was able to go to the physical stores of two of my favourite online places to buy food. Living in a smallish, rural town means that for a lot of recipes I want to make I either have to substitute or buy ingredients online. When it comes to perishable items substitution is, really, the only why to go but for non-perishables I have found a large number of Australian online stores from which to get my various needs wants. Two of my favourites are Essential Ingredients Online, which has physical stores in Coffs Harbour and Port Macquarie, and Kombu Wholefoods, whose physical store is in Bellingen. After trawling these websites on countless numbers of occasions and having placed a number of orders I was pleased to be able to spend time in the actual stores. I wasn't disappointed with either of them and will make a point to head to both of them again any time I am in the area. 

Amongst the numerous items that I bought from the above stores were red quinoa and turtle beans (or black beans depending on where you live). I had a few ideas on what I wanted to do with them but also googled and 
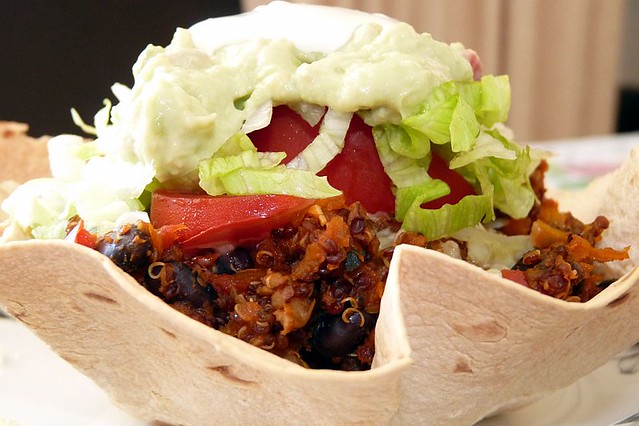
food blog searched to see what I could make with them. I came up with a number of recipes for each separately but I decided to make something using both of them. I had a bit of a hankering for some tacos and remembering that when I was a kid mum used to make tacos with lentils and kidney beans I decided to see if I could make a taco filling using red quinoa and turtle beans. To add a bit of bulk to it I threw in some carrot, capsicum and as I had some mushrooms slowly dying a slow death in the crisper I chopped them and and threw them in too. I used some of my homemade taco seasoning, although you could use one of those packets from the supermarket, and canned tomatoes. It made an amazing filling. I felt so satisfied after eating the tacos. They really hit the spot so I think I will be making these regularly. The first night I used some warmed tortillas and just had soft tacos.  For lunch the next day I draped a tortilla over a mould and put it in the oven and formed a bowl. I really enjoyed it that way, kind of a combinations between a taco and nachos. I have also had some with some rice with a bit tomato juice added in when re-heating for a kind of faux chilli. 

Red Quinoa, Turtle Bean & Carrot Tacos 

Ingredients: 
  • 1/2 c dried black turtle beans (soaked for at least 6 hours)
  • 1/2 c red quinoa (soaked for 30 minutes and drained thoroughly) 
  • 1 tbsp grapeseed oil (any neutral oil will be fine)
  • 1 onion, finely chopped 
  • 2 cloves garlic, crushed
  • 2 medium carrots, grated 
  • 1 capsicum, finely diced 
  • 250 g mushrooms, finely diced 
  • 1 packet taco seasoning, or homemade mix to taste (see recipe below) 
  • 400 g can diced tomatoes 
  • 1/2 can water 
  • salt & pepper to taste
Method: 
  • Drain beans and place in a saucepan with clean water. Bring to the boil and then simmer for 20 - 30 minutes or until they still have a bit of bite. Try not to cook until too soft as they will be cooking further later on. Drain and set aside.
  • Heat oil in a pan over a medium heat. Add onion and cook until softened but not browned. Add garlic and cook for a further minute. 
  • Add carrot, capsicum and mushrooms and cook, stirring, for 5 minutes then add quinoa and beans. 
  • Add taco seasoning and stir to coat everything. 
  • Add tomatoes & water, bring to a boil then reduce heat to simmer. Cover and cook until liquid has been absorbed and quinoa and beans are cooked adding more water if necessary.
  • Taste, adjust seasonings and serve with warmed tortillas, shredded lettuce, sliced tomato, grated cheese, guacamole and sour cream (or yoghurt). 
Taco Seasoning

Ingredients: 
  • 6 tsp Chilli Powder
  • 5 tsp Paprika
  • 4 ½ tsp Cumin
  • 3 tsp Onion Powder
  • 2 ½ tsp Garlic Powder
  • 1/8 tsp Cayenne Pepper

In storage container with tight-fitting lid, combine all ingredients and mix well.  Seal tightly. Store in cool, dry place for up to 6 months.  

Seven teaspoons of mix equal a pkg of purchased taco seasoning mix. (This will vary depending on the heat rating of you chilli powder so I suggest starting out with less and adding more if needed)

Tuesday 24 May 2011

Roast Chicken with Yoghurt Garlic Sauce

I am not feeling very chatty at the moment, so another post of just a recipe. This is a good one too. 

Roast Chicken with Yoghurt Garlic Sauce 

Ingredients
  • 1 x 1.5 kg chicken (backbone removed & flattened out) 
  • sea salt and freshly ground black pepper 
  • 1 onion, finely sliced 
  • 2 lemons (one finely sliced)
  • 1 tbsp chopped oregano (I used dried) 
  • 5 tbsp olive oil

Method: 
  • Season chicken on both sides with salt & pepper. 
  • Spread onion on the bottom of a roasting tray, place chicken on top of onions (skin-side up).
  • Top with slices of lemon, sprinkle with oregano and drizzle with 2 tbsp oil. Cover, refrigerate for 4 hours. 
  • Pre-heat oven to 250C. Remove chicken from marinade and place on a clean baking tray and place under a very hot grill for 10 minutes or until chicken is golden brown. Turn chicken over, drizzle with another tbsp of oil and cook on the other side until golden brown. 
  • Return chicken, skin-side up, to the tray with the onions and drizzle with remaining oil. Bake for 15 minutes. 
  • Squeeze juice of remaining lemon over the chicken and cook for a further 10 minutes or until cooked.
Yoghurt Garlic Sauce

Ingredients: 
  • 2 cloves garlic, crushed
  • 1/4 tsp sea salt
  • 1 cup yoghurt 
Method: 
  • Mix all ingredients together.  
  • Leave for at least 1 hour for flavours to combine. 

Saturday 21 May 2011

Open-faced Omelette with Fresh Tomato, Emmenthal & Rocket

Hope that you all had a good breakfast this morning. I made this weeks ago now...wish I had made it again this morning. 

Open-faced Omelette with Fresh Tomato, Emmenthal & Rocket

Per person (I think it is enough for two)

Ingredients: 
  • 3 eggs 
  • a pinch of salt 
  • 10 g butter
  • 2 spring onions, chopped 
  • 1 ripe tomato, sliced 
  • 2 slices of Emmenthal (I did have this so used whatever cheese I had) 
  • 1 handful rocket, tossed in a little olive oil and sea salt
  • black pepper
Method: 
  • Beat eggs, salt and 2 tbsp water until just combined. 
  • Melt butter in a frying pan over a medium heat. 
  • Pour in egg mixture. 
  • As it starts to cook add spring onions then tomato slices and cheese and cook for 2 - 3 minutes. 
  • Place under preheated grill to finish off. 
  • Top with rocket & black pepper and serve immediately. 

Thursday 19 May 2011

Parmesan Veal Schnitzel with Creamed Potatoes

I am so tired and I am heading off to bed very shortly but I just wanted to get something posted. I was looking through things last night and realised that I have so many things that I have made from Sydney Food that I haven't yet blogged about. I also have a number of other things that I want to post too. It has been hard to go back to work after a couple of weeks off. Haven't been feeling well or sleeping well either so it is all just a bit of a "perfect storm" of blah at the moment. 

I made this a while ago now. I couldn't get any veal at the time but my wonderful butcher gave me some wonderfully tender beef although I can't remember exactly which cut he gave me now. ***oops*** I would definitely make this again. The left overs were very good too. I served with spicy roast sweet potato and steamed broccoli & cauliflower. 

Parmesan veal schnitzel with creamed potatoes

Ingredients: 
  • 8 veal escallops
  • 1 cup fresh breadcrumbs (I made them from wholemeal bread)
  • 1 cup finely grated Parmesan cheese
  • 1/2 cup parsley 
  • 2 tbsp finely chopped thyme 
  • 1 teaspoon sea salt 
  • freshly ground black pepper 
  • 1/4 cup milk 
  • 2 eggs 
  • 1 cup plain (all-purpose) flour 
  • 1/2 cup olive oil
Method:
  • Place veal escallops on a board and flatten with a mallet. Place breadcrumbs, parmesan cheese, parsley, thyme, salt and pepper in a bowl and mix well. Place milk and eggs in a bowl and beat lightly together. Place flour in a bowl.
  • Dip veal first in the flour, then egg wash and finally in breadcrumb mixture. Continue until all veal is coated.
  • Heat olive oil in a large non-stick frying pan over medium heat. Place veal in frying pan in a single layer, being careful not to crowd, and cook for two minutes until golden brown on one side. Turn veal and cook for a further two minutes. Remove from pan and keep warm until all the veal escallops are cooked. Serve with creamed potatoes.
Creamed potatoes 

Ingredients
  • 800g potatoes suitable for mashing
  • 1 cup cream (I used natural yoghurt)
  • 75g butter 
  • 1 tsp sea salt
Method:  
  • Place potatoes in boiling water and cook until tender. 
  • Remove from heat, drain and mash potatoes in saucepan. 
  • Beat yoghurt & butter into potatoes with a wooden spoon until smooth. Season with salt to taste. 

Sunday 15 May 2011

Delicious May 2011 - Tomato Soup with Melting Bocconcini

Hmmm, I have been on holidays. I went away for a few days. I had planned on doing a lot of blogging throughout my two weeks off but it just didn't turn out that way. Oh well, I guess that is just the way that things turn out some times. 

I really couldn't go past the cover recipe from this issue. Valli's Tomato Soup with Melting Bocconcini just looked so inviting. I also love making tomato soup as with the leftovers use it to make a lovely tomato risotto. I just loved this recipe it was relatively easy to make. It was rich and wonderful. Make sure to take the bocconcini straight from the oven and into the soup. Mine sat for about a minute and they were a bit rubbery. Oh, and next time I would roast the cherry tomatoes later too as they were cold by the time I served the soup. I think it would have been better to have been much better if they were hot. Although I have a recipe for tomato soup that I have made several times I think it will definitely be replaced with this one. I served it with the Parmesan & Garlic Bread recipe that followed.

Tomato Soup with Melting Bocconcini 

Ingredients
  • 1.2 kg roma tomatoes, halved
  • pinch caster sugar 
  • 1 tbsp olive oil, plus extra to drizzle 
  • 12 vine-ripened cherry tomatoes
  • 50 g unsalted butter 
  • 2 each, onions, carrots, celery & garlic cloves, chopped 
  • 400g can chopped tomatoes 
  • 2 tbsp sundried tomato paste (I used tomato pesto) 
  • 1 bay leaf
  • 1 basil sprig, plus extra leaves for garnish 
  • 1 L (4 cups) vegetable stock 
  • 12 baby bocconcini
Method:
  • Pre-heat oven to 160 C. Place roma tomatoes, cut side up, on a baking tray. Sprinkle with sugar, drizzle with oil and season. Roast for 30 minutes until softened.
  • Add cherry tomatoes to the tray, drizzle with a little more oil and season. Return to the oven for a further 10 minutes or until lightly charred and softened. Set aside. 
  • Heat butter and 1 tbsp oil in pan over a medium heat. Cook onion, carrot, celery and garlic, stirring, for 2 - 3 minutes or until softened. Add canned tomatoes, tomato paste, bay leaf, basil, stock, roasted roma tomatoes and any cooking juices. Bring to the boil, then reduce heat to low and cook, stirring occasionally, for 20 - 25 minutes or until vegetables are tender. (I cooked about 40 minutes) 
  • Discard basil sprig & bay leaf, cool slightly, then blend the soup in batches. Pass through a sieve into a clean pan, then cook over low heat, stirring, for 2 - 3 minutes or until warmed through. Adjust seasoning. 
  • Place the bocconcini on a baking try lined with baking paper and bake for 2 - 3 minutes until just warm and lightly melted (do not overcook or the cheese will melt completely). Ladle the soup into serving bowls and scoop molten bocconcini into each one. Garnish with the roasted cherry tomatoes and basil leaves.
Parmesan & Garlic Bread

Ingredients: 
  • 3 garlic bulbs (skin on), halved horizontally
  • 2 tbsp olive oil 
  • 250g unsalted butter, softened (I used 150 g)
  • 2 tbsp chopped parsley 
  • 2 sourdough baguettes (I used regular) 
  • 1 1/4 c finely grated parmesan 
Method: 
  • Pre-heat oven to 170C 
  • Drizzle garlic with oil and roast for 40 minutes or until soft. 
  • Cool and then squeeze from the skin and mash together with the parsley & butter. 
  • Cut baguettes diagonally, but not all the way through. 
  • Spread with butter and then stuff some parmesan in and then sprinkle the rest on top. 
  • Bake for 15 minutes or until crisp. 

Saturday 7 May 2011

Fine Steak Sandwich with Garlic Crème

I went out for breakfast this morning at a local cafe. Just a simple breakfast of poached eggs on toast but it was wonderful not to have to make it myself. It was also good to have poached eggs. I have never had much luck doing poached eggs. I even tried those silicone poach pods and didn't have any luck with them either. I will have to try again though since there is a poached eggs with spinach recipe in Sydney Food but for now I was happy that someone else was making it for me. The leisurely breakfast was followed by a walk around the shops and then bought some lunch and went to the park for a bit of a picnic. I wasn't quite the picnic lunch that I had envisioned earlier in the week with this Beetroot and Feta Tart that I found over at nami-nami but it was still very good and nice and relaxing half day out.

So I am still catching up with recipes made a while ago. I really enjoyed these steak sandwiches, also called the Perfect Steak Sandwich. I could not find any nice ciabatta when I was shopping so used some bread that I already had and toasted it, although ciabatta would have been much nicer. I loved the balsamic caramelised onions, which are very easy to make. In fact I made extra so that I could use them with other things. They are particularly good on pizzas. The garlic crème, a mayonnaise flavoured with garlic and balsamic vinegar was very tasty, although it does not have a long shelf life. You could add some balsamic and roasted garlic to some store bought mayonnaise for something a bit longer lasting. Although the roasted garlic will have a milder flavour. Neil Perry's signature mayonnaise is a very good store bought one that has a similar consistency and taste to a homemade mayonnaise. I used grapeseed oil in place of the canola oil. I didn't have any rocket but did use some baby spinach leaves I had in the fridge. I got a piece of sirloin steak sliced fairly thinly from my wonderful local butcher, I managed to cook it probably a minute too long. It was a perfect lunch time meal or for a light main meal. 

Thursday 5 May 2011

Corn & Ginger Soup

I didn't manage to get my picnic in today but I did get a bunch of stuff done around the house. Plus I started to sort through my dvds, cds, books and previously unpacked boxes in preparation for a garage sale. It has been almost 2 years since I moved house. In my previous house I had so much stuff and oodles of storage. I am now in a slightly smaller house with little storage space. There is so much stuff that I just don't need or use so it is time for it to go. I have been saying that I would have a garage sale for about a year now but finally decided to do something about it. 

I remember a soup recipe in a Nigella book that she referred to as 'my body is a temple' soup although I don't remember now anything about the actual recipe. It was my first thought when I saw this recipe though. A very quick and simple recipe. Full of flavour and almost restorative. It was so easy to whip up for a quick lunch. I think this will end up being a regular in my house. 

Corn & Ginger Soup

Ingredients:
  • 1 tablespoon grapeseed oil
  • 1/2 cup green onions, finely sliced, plus extra to serve
  • 1 tbsp ginger, finely sliced 
  • 2 cups corn kernels, cut from cobs (or frozen) 
  • 4 cups chicken stock (I used vegetable)
  • 1 tbsp shao hsing wine
  • 1/4 teaspoon white pepper
  • 1 tsp sugar
  • 1 tsp salt
  • 2 tbsp soy sauce
  • 1 tsp sesame oil, to serve
Method: 
  • Heat oil in large saucepan over medium heat.
  • Add green onions and ginger, stir for 1 minute. 
  • Add corn, stir for another minute (or longer if corn is still frozen).
  • Pour in stock, bring to boil.
  • Season with wine, salt, pepper, sugar, soy sauce.
  • Simmer for 5 minutes.
  • Ladle into bowls and sprinkle with green onions and drizzle with sesame oil. 

Wednesday 4 May 2011

Sweetcorn Fritters with Roast Tomato & Bacon

It is hard to believe that it is Wednesday already. I have already been on holidays for 3 days. Oh, how blissful it is. I really haven't been doing much, I guess that is fine though. I had planned on having a picnic lunch yesterday. I had an appointment to get my hair cut and thought that as long as I was out I could take my kindle and grab some lunch and go to one of the many parks in town and just kick back. However the day was cold and cloudy. So not good picnic weather. Today would have been much better for that but I had other things to do today. If tomorrow is looking nice I think I will do it then. 

I made this recipe several weeks ago now. This was one of the things that I made when I was struggling so badly. When things go a bit crazy for me some times it is the little things that I focus on. One of those things is cooking. I find that while I can barely function at work or in the home I can normally produce some pretty amazing food (even if I do say so myself). I also tend to really focus on good food too rather than junky food or fat laden cakes and desserts as it helps to lift me out of the depths. Although I will admit that when deep, deep down in depression I will crave Mac & Cheese. Not just any mac & cheese though. Homemade with a thick sauce flavoured with finely diced onion & bacon and 3 or 4 different types of cheese and a hint of hot mustard. It is as much about the process of making it as the actual eating that helps me. 

I was really impressed with these fritters for breakfast. I would definitely make them again. Although would probably try using well-drained tinned corn next time to see if it works. Not that I really mind removing the kernels from cobs but it can be a bit messy, time consuming and means that these would be a seasonal thing. I didn't have any roma tomatoes but did have some small grape tomatoes so roasted them instead. I just added extra parsley in place of the coriander. I made half the recipe and got 4 nice sized fritters from it. 

Sweetcorn Fritters with Roast Tomato & Bacon

Tomatoes:

  • 4 small tomatoes, preferably Romas
  • 4 tablespoons extra-virgin olive oil
  • Salt
  • Freshly ground black pepper
Method:
  • Preheat the oven to 350 degrees. 
  • Cut each tomato in half lengthwise. 
  • Place on a roasting tray, cut side up. 
  • Drizzle with olive oil and season generously with salt and pepper. Roast for 40 minutes.
Corn Fritters:  

  • 1 cup flour
  • 1 teaspoon baking powder
  • 1/4 teaspoon salt
  • 1/4 teaspoon paprika
  • 1 tablespoon sugar
  • 2 large eggs
  • 1/2 cup milk
  • 2 cups corn kernels
  • 1/2 cup red capsicum, cut into small dice
  • 1/2 cup sliced green onions, sliced 
  • 1/4 coriander & parsley (I used all parsley)
  • 2 tablespoons vegetable oil
  • 1 cup rocket
  •  4 rasher bacon, grilled 
Method: 
  • Sift the flour, baking powder, salt and paprika into a medium bowl. Add the sugar, stir to combine, and make a well in the center of the dry ingredients. 
  • In a medium bowl, whisk the eggs and milk until combined. 
  • Gradually add the egg mixture to the dry ingredients and whisk until a smooth, stiff batter forms. 
  • In a large bowl, place the corn, capsicum, green onions and herbs. Add the batter and combine.
  • In a large nonstick frying pan, heat the vegetable oil over medium heat. When the oil is hot, add 2 tbsp of batter for each fritter. Fry for 2 minutes or until the underside of each fritter is golden. Turn the fritters over and cook until the other side is golden. 
  • Transfer to another plate and keep warm while cooking the remaining fritters.
  • Serve two fritters per person with rocket, bacon and tomatoes